使用Dagger 2来构建UserScope(翻译)
使用Dagger 2来构建UserScope
原文:http://frogermcs.github.io/building-userscope-with-dagger2/
在Dagger 2中自定义scopes可以在不寻常存活时间(与Application和界面生命周期不同的)的依赖上给我带来更好的控制。但是在Android app中正确地实现它需要记住几个事情:scope不能存活比application进程更长的周期,进程可以被系统杀死并且在更多的对象实例的用户流中恢复过来。今天我们将介绍所有这些,并尝试实现可用于生产的UserScope。
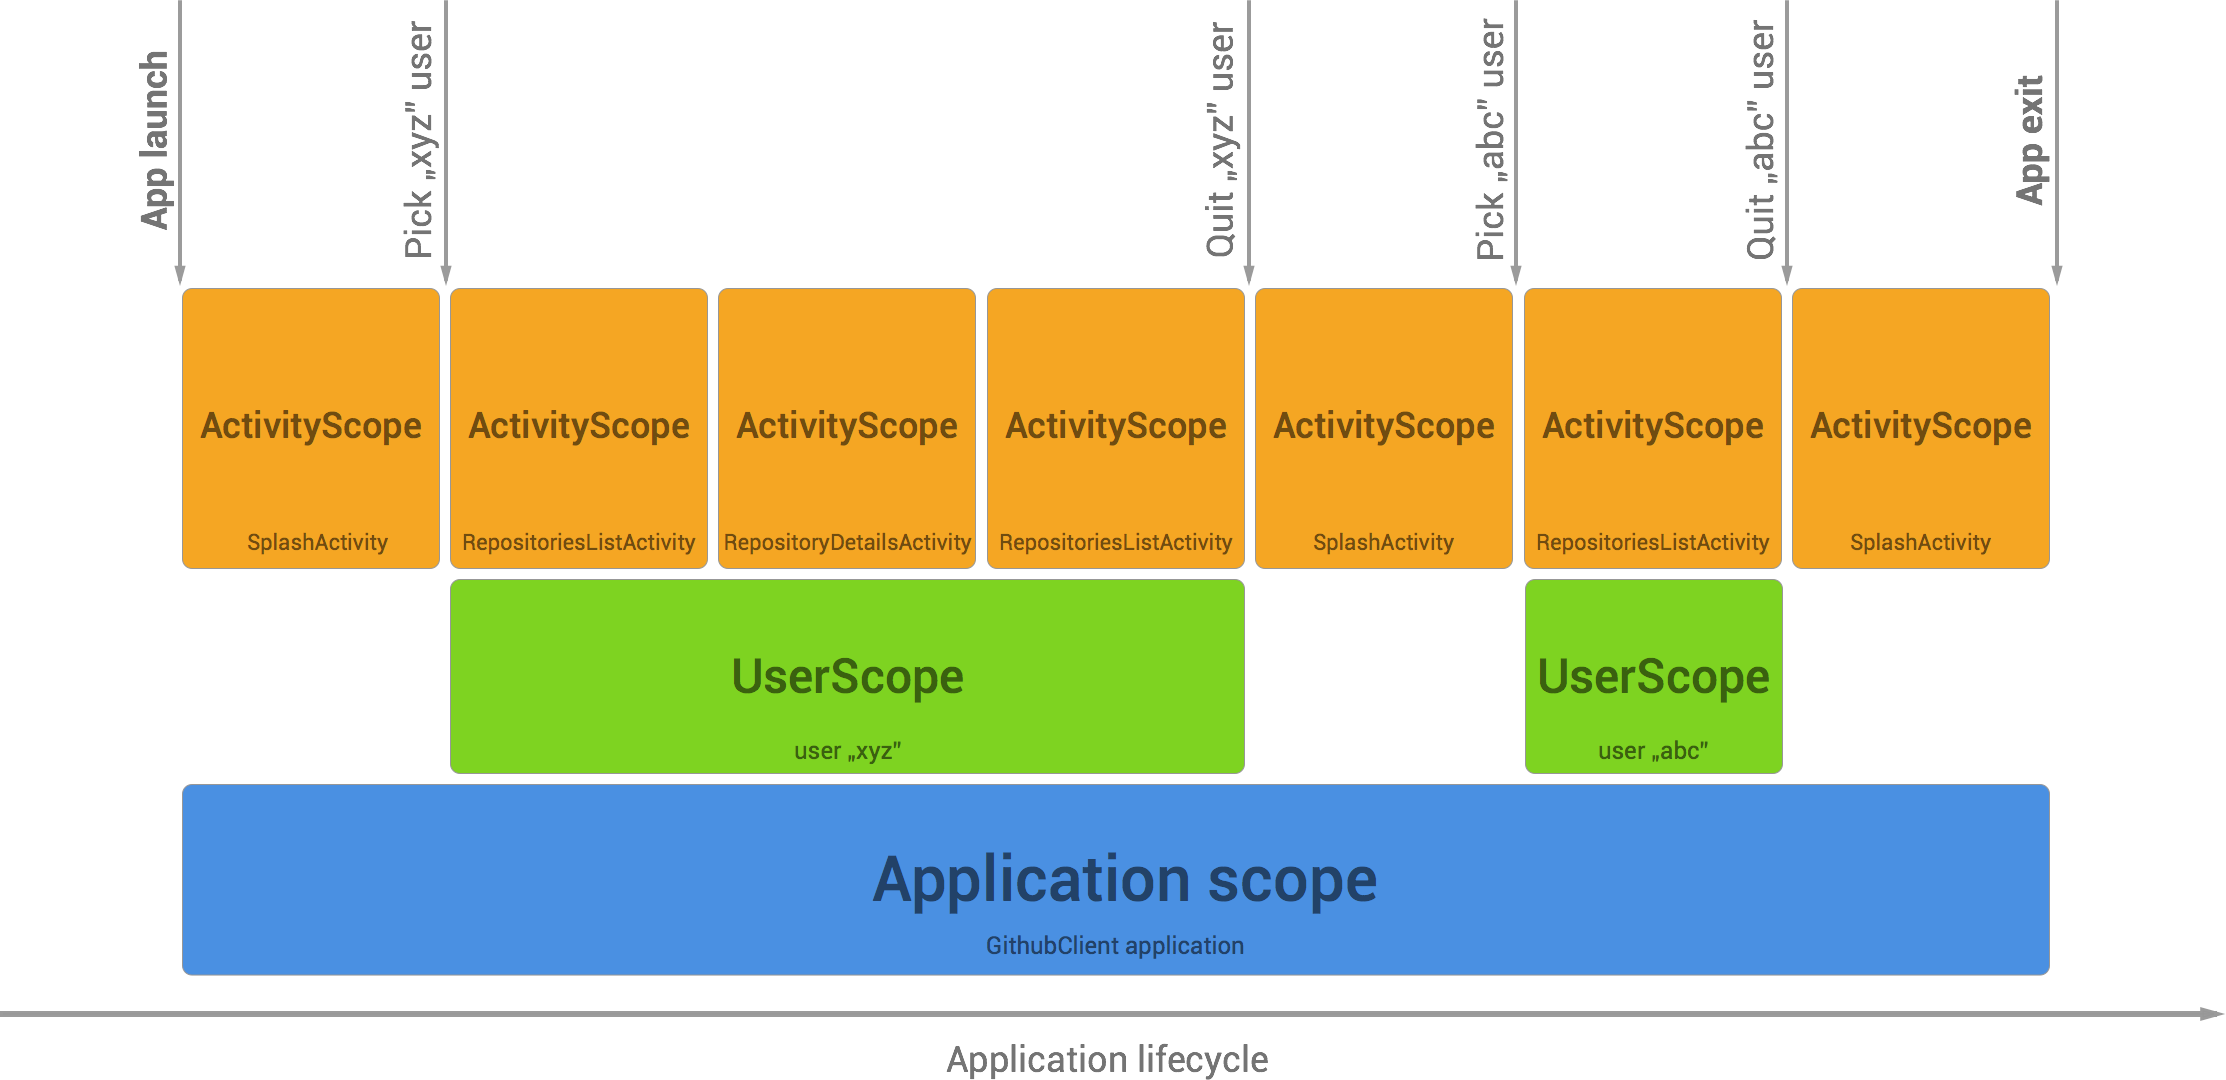
在我的其中一篇博客中写了关于自定义scopes和Subcomponents。作为一个例子,我使用了UserScope,只要用户是登录状态就应该存活。一个scopes生命周期的例子:
虽然它看起来非常简单,它的实现在那篇文章中已经展示,但是它的代码是脱离与生产环境的。这就是为什么我想要又一次深入这个话题 - 但是会有更多实现的上下文细节。
Example app
我们将构建3个界面的应用,它可以从Github API获取用户详情(让我们假设这在生产环境app中作为一个认证的事件)。
App将会有3个scopes:
- (Application scope, @Singleton) - 只要application存活依赖就存活。
- @UserScope - 只要用户会话是激活状态依赖就存活(在单个应用程序中启动)。重要的是:这个scope存活时间不会超过application本身。每一个新的app实例都会创建一个新的@UserScope(甚至app不同的启动间用户会话没有关闭)。
- @ActivityScope - 只要Activity界面存活依赖就存活。
它怎么工作的呢?
当app从Github API得到特定用户名的数据,新的界面会被打开(UserDetails)。在内部,LoginActivityPresenter访问UserManager来开启一个会话(从Github API获取数据)。当操作成功,用户保存到UserDataStore,并且UserManager创建UserComponent。
1 | //UserManager |
UserManager是一个单例,所以它的存活时间与Applicaiton一致,而且它对生命周期与用户会话一样的UserComponet负责。当用户决定去关闭会话,component会被移除,这样所有@UserScope注解了的对象应该准备被GC回收。
1 | //UserManager |
Components的层次结构
在我们的app中所有的subcomponents使用了一个AppComponent作为一个根component。显示用户相关内容的Subcomponents使用保持了带@Userscope注解的对象(一个用户会话一个实例)的UserComponent。
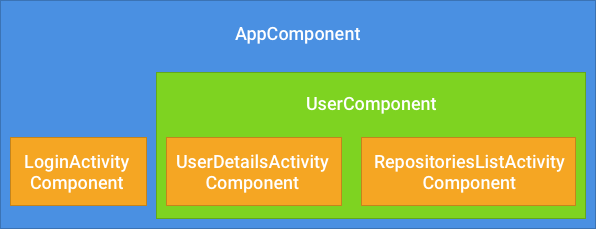
UserDetailsActivityComponent组件层次结构示例如下所示:
1 | // AppComponent.java |
对于UserComponent,我们使用Subcomponent builder模式来让我们的代码更加整洁,有可能注入这个Builder到UserModule(UserComponent.Builder用于创建组件UserModule.startUserSession方法如上所示)。
在app的多次启动中恢复UserScope
就像我之前提到的UserScope的存活时间不能超过application进程。所以如果我们假设用户会话可以在app的多次启动之间保存,我们需要为我们的UserScope去处理状态恢复操作。有两种场景我们需要记住:
用户从头开始启动程序
这是最常见的情况,应该很简单地去处理。用户从头开始启动app(比如,通过点击app icon)。Application对象被创建,然后第一个Activity(LAUNCHER)被启动。我们需要提供简单的逻辑检查我们是否有保存的用户在我们的数据存储中。如果是则将用户传送到UserComponent自动创建的正确的界面(在我们案例中是UserDetailsActivity)。
用户进程被系统kill
但是还有一种情况我们经常会忘记。Application进程可以被系统杀死(比如,因为内存不足)。这意味着所有application数据被销毁(application,activities,static fields)。不幸的是这不能被很好的处理 - 我们在Applicaiton生命周期中没有任何回调。令它更复杂的是,android保存了activity栈。也就是说,当用户决定启动之前被杀死于流中间的应用程序时,系统将试图带用户回到此界面。
对于我们而言我们需要准备在任何被使用的屏幕中去恢复UserComponent。
让我们考虑这个例子:
1. 用户在UserDetailsActivity界面最小化app。
2. 整个app被系统杀死(稍后我会展示如何模拟它)
3. 用户打开任务切换栏,点击我们的app界面。
4. 系统创建了一个新的Application实例。也就是说有一个新的AppComponent被创建。然后系统并不会打开LoginActivity(我们的启动activity),而是立即打开UserDetailsActivity。
对于我们而言,UserComponent被恢复回来(新的实例被创建)。然后这是我们的责任。例子的解决方案看起来如下:
1 | public abstract class BaseUserActivity extends BaseActivity { |
每一个使用了UserComponent的Activity都继承了我们的BaseUserActivity类(setupActivityComponent()方法在BaseActivity的onCreate()方法中调用)。
UserManager从Application创建的AppComponent中被注入。会话通过这种方式开启:
1 | public boolean isUserSessionStartedOrStartSessionIfPossible() { |
如果用户不再存在怎么办?
这里有另外一种方式来处理 - 如果用户登出(比如,通过SyncAdapter),然后UserComponent不能被创建怎么办?这就是为什么在我们的BaseUserActivity中有这几行:
1 | private void setupUserComponent() { |
但是这里有一个情况时当UserComponent不能被创建时我们必须要记住依赖注入将不会发生。这就是为什么我每次需要在onCreate()方法中检查来防止来自依赖注入的NullPointerExceptions。
1 | //UserDetailsActivity |
怎么去模拟应用进程被系统杀死
1. 打开你想测试的用户界面
2. 通过系统Home键最小化app。
3. 在Android Studio,Android Monitor 选中你的应用,然后点击Terminate
4. 现在在你的设备上打开任务切换栏,找到你的app(你应该仍然能在最后一个可见的界面上预览到)。
5. 你的app被启动,新的Application实例被创建,并且Activity被恢复。
源码
例子中展示怎么样去创建和使用UserComponent的可用的源码已经在Github上:Dagger 2 recipes - UserScope。
感谢阅读!
作者
Head of Mobile Development @ Azimo
[Android]使用Dagger 2依赖注入 - DI介绍(翻译):
http://www.cnblogs.com/tiantianbyconan/p/5092083.html
[Android]使用Dagger 2依赖注入 - API(翻译):
http://www.cnblogs.com/tiantianbyconan/p/5092525.html
[Android]使用Dagger 2依赖注入 - 自定义Scope(翻译):
http://www.cnblogs.com/tiantianbyconan/p/5095426.html
[Android]使用Dagger 2依赖注入 - 图表创建的性能(翻译):
http://www.cnblogs.com/tiantianbyconan/p/5098943.html
[Android]Dagger2Metrics - 测量DI图表初始化的性能(翻译):
http://www.cnblogs.com/tiantianbyconan/p/5193437.html
[Android]使用Dagger 2进行依赖注入 - Producers(翻译):
http://www.cnblogs.com/tiantianbyconan/p/6234811.html
[Android]在Dagger 2中使用RxJava来进行异步注入(翻译):
http://www.cnblogs.com/tiantianbyconan/p/6236646.html
[Android]使用Dagger 2来构建UserScope(翻译):
http://www.cnblogs.com/tiantianbyconan/p/6237731.html
[Android]在Dagger 2中Activities和Subcomponents的多绑定(翻译):
本文链接:https://blog.wangjiegulu.com/2016/12/30/Android-使用Dagger-2来构建UserScope(翻译)/
版权声明:本博客所有文章除特别声明外,均采用 CC BY 4.0 CN协议 许可协议。转载请注明出处。